Troubleshooting
Before sending your Vortex product in for warranty service, please review the following customer concerns. After reading through our troubleshooting tips, you may feel your Vortex product needs warranty service or evaluation—visit the VIP Warranty page for our return procedure.
Binoculars
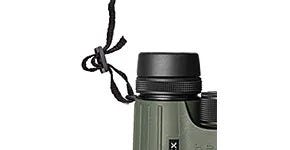
How do I attach a neck-strap to a binocular?
Step 1
Thread the end of the strap from the bottom, then up through the
strap attachment loop.
See image.

Step 2
Hold the buckle and thread the end of the strap inside the buckle.
See image.
Step 3
Adjust the overall length and pull the strap webbing tight so it
is secure within the buckle.
See image.

Note: Threading a metal ring directly onto the binocular’s strap attachment with rings, clips or other aftermarket equipment will result in broken strap attachments. Instead, use nylon zip ties around the strap attachment and attach metal rings to the nylon zip ties.
What do the numbers mean? (i.e. "10x50")
The first number in the pairing, “10”, is the binocular’s magnification. In this case, 10x binoculars will magnify your image 10 times. The second number, “50”, is the objective lens diameter in millimeters. (The objective lenses are the lenses at the end of the binocular, farthest from your eye when looking through the optic). Therefore, 10x50 binoculars have a 50mm objective lens diameter. When all else is similar, a wider objective lens will take in more light, making the image brighter.
What is the best magnification for binoculars?
It depends on the application and bigger numbers aren’t always better.
For hunters in thick timber where deer or other quarry can rarely be seen more than 200 yards away, the wider field of view, brighter image and reduced shakiness from hand holding of an 8x42 would be ideal.
For hunters in vast open landscapes who need to pick apart the side of a large mountain or landscape far away may opt for a larger binocular like a 12x50 or even an 18x56, knowing they’ll be using it on a tripod for stability for long periods of time.
Generally speaking, 10x42’s are a good middle ground all around, but all situations may vary. For more personalized help, feel free to give us a call at 1-800-486-7839 with your exact application and we’re more than happy to get you into the perfect magnification and size binocular.
How do I set the diopter?
The diopter is a ring usually located directly underneath the right-side eyecup. Where the center focus wheel adjusts the focus of each barrel in tandem, the diopter individually focuses only the right side to account for people with different prescriptions.
To set your diopter, start with your right eye closed, looking through only the left barrel of your binocular. Using the center focus wheel, adjust the focus until the image through the left side with your left eye is perfectly clear. Once the left side has been made clear using the center focus wheel, close your left eye and open your right eye. Now, use the right-side diopter underneath the eyecup to adjust the focus for your right eye individually (if necessary). Once the right side has been made perfectly clear to your right eye, you can open both eyes and use the center focus wheel from then on. Now, both eyes should focus together, even if they are different prescriptions.
What binocular is best for someone with a narrow IPD (interpupillary distance)?
Porro prism binoculars, such as our Raptor binoculars, are a great fit for people with a narrow IPD as they fit a wide range of face sizes. You’ll know when you see a porro prism binocular because it will appear to have a “bend” in the two individual tubes, as opposed to a common roof prism binocular which has two individual tubes that appear to be totally straight from eyepiece to objective end.
Monoculars
How do I attach a neck strap to a monocular?
Step 1
Thread the end of the strap from the bottom, then up through the
strap attachment loop.
Step 2
Hold the buckle and thread the end of the strap inside the buckle.
Step 3
Adjust the overall length and pull the strap webbing tight so it
is secure within the buckle.
Note: Threading a metal ring directly onto the monocular’s strap attachment with rings, clips or other aftermarket equipment will result in broken strap attachments. Instead, use nylon zip ties around the strap attachment and attach metal rings to the nylon zip ties.
What do the numbers mean? (i.e. 10x36)
The first number in the pairing, “10”, is the monocular’s magnification. In this case, 10x monoculars will magnify your image 10 times. The second number in the pairing, “36”, is the objective lens diameter in millimeters (the lenses farthest from your eye when looking through the optic). Therefore, 10x36 monoculars have a 36mm objective lens diameter. When all else is similar, a wider objective lens will take in more light, making the image brighter.
Rangefinders
Why am I not getting a range?
You may not be getting a range for a number of different reasons:
- Atmospheric conditions.
- Stability.
- Type of target
- Distance of target (some are farther than you think).
- Size of target.
- Dirty laser lens.
- Finger is over the laser.
I have an ‘1800 yard capable’ (or insert any maximum range) rangefinder, but can’t range 1800 yards:
There are many reasons as to why you may not be able to the reach the maximum range on your rangefinder. The most common is type of target. The maximum distance is given using a reflective target. With non-reflective targets (animals) you will likely have to cut that range in half. The color and size of the target, stability, atmospheric conditions all play a factor as well. Ranging darker or black targets, smaller targets, through fog, over water, or into the sun will make it more difficult to get a reading back on your rangefinder.
How do I get out of LOS mode?
- Press the measure button once to bring up the crosshairs.
- Press and hold the menu button for 5 seconds.
- Press the measure button once, this will switch the rangefinder to
HCD mode. - Press and hold the menu button for 3 seconds to exit the menu.
How do I get out of HCD mode?
- Press the measure button once to bring up the crosshairs.
- Press and hold the menu button for 5 seconds.
- Press the measure button once, this will switch the rangefinder to
LOS mode. - Press and hold the menu button for 3 seconds to exit the menu.
When do I want LOS mode and when do I want HCD mode?
LOS stands for Line of Sight – This will give you the exact distance of the target with no compensation for angle. Generally, this will be used when calculating how much you need to hold for wind on a long-range shot.
HCD – Horizontal Component Distance – This is an angle compensating mode, that will account for the angle from you, to the target. Anytime you are shooting, uphill or downhill, the projectile will drop less as it is not accounting for gravity in a straight down fashion. This means your bullet or arrow will drop less if you are shooting uphill or downhill. HCD mode will give you the yardage you need to account for while adjusting for the drop of the projectile.
Why does one tube in my Fury have a blue tint and the other doesn’t?
This is the tube that the LCD display is in.
How do I change from yards to meters, or vice versa?
- Press the measure button once to bring up the crosshairs.
- Press and hold the menu button for 5 seconds.
- Press the menu button once, then press the measure button to toggle back and forth between yards (Y) and meters (M).
- Press and hold the menu button for 3 seconds to exit the menu.
Red Dot Scopes
What does it mean if the dot is not a dot?
If the dot in your optic doesn’t look perfectly round, the distortion may be caused by the way your eye is perceiving the reflection of the LED inside the red dot, making it appear misshapen. This is called astigmatism. Most everyone has some degree of natural astigmatism. Here are a few ways you can tell if the distortion is caused by your eye or if there is a problem with the optic:
- Take a photo of the dot with your phone. Face the optic towards a plain, dark background. Set the illumination at a reasonable intensity level for the environment (i.e. if you are indoors, don’t’ set it at the highest magnification as the dot may begin to bleed from being too bright for ambient light). Take a photo and compare what the camera is seeing to what your eye is seeing. If the shape is the same, then there may be a problem with your red dot.
- Look through the dot with both eyes. If the dot changes shape from one eye to the other, the misshapen dot is likely caused by astigmatism.
- Look through the red dot and rotate the scope on its optical axis. If the irregular shape maintains its position, it’s likely how your eyes are seeing the dot. If the irregular shape of the dot rotates with the optic, there may be a problem with the optic.
Note:The appearance of a starburst can be caused simply by having the brightness intensity too high for the environment. Turning the brightness up to the maximum brightness indoors or in low light is very likely to cause the dot or reticle to bleed or look like a starburst, regardless of whether or not you have an astigmatism and it is not recommended. Turning down the brightness in many cases will help the dot look crisper while still maintaining quick acquisition.
Why won’t my red turn on?
- Try changing the battery first.
- If you’ve replaced the battery, make sure it is properly installed with the battery cap fully seated.
- If your unit still doesn’t come on, it is possible that you are in night vision setting.
- Try increasing the dot intensity until the dot becomes visible in normal conditions.
- If you still don’t see a dot or reticle, the unit may be defective and should be sent in for warranty service.
Why won’t my red dot turn off?
- Red dots with digital button controls require the off button to be depressed for 5 seconds to turn the unit off.
- If your red dot won’t turn off after depressing the off button, or begins shorting out, change the battery.
- If your unit won’t turn off at this point, it may be defective and should be sent in for warranty service.
Why doesn’t my dot look bright anymore, even on maximum brightness?
- Batteries naturally put out less power as they drain. The closer your battery gets to dying, the dimmer the dot will appear even when on maximum brightness.
- Change to a new battery and check to ensure the dot is at a normal brightness level.
- If your dot still appears much dimmer than normal, it may be defective and should be sent in for warranty service.
Why does the dot appear much bigger than it’s supposed to?
- If you’re in a relatively low-lit area or indoors, try turning down the brightness to a more appropriate level for the ambient light.
- Focus on the target rather than looking at the dot and keep both
eyes open. - If you happen to be looking through the optic with the objective lens cover on, this will also make the dot seem larger than normal.
- With the dot at an appropriate illumination intensity and any objective cover removed, does the dot appear as it should? If not, feel free to send it in for warranty service and evaluation.
What does it mean if the dot is a cluster of dots, not one dot?
Sometimes, when we look at the dot long enough, our brains will begin to adjust for what we are seeing and actually separate the dot into pixels. This is particularly obvious if looking through the red dot if any kind of objective lens cover is in place. Rest your eyes for a moment, then look through the scope with the objective flip-cap open, as if you are using it on your gun. Does this make the dot appear as it should? If not, feel free to send it in for warranty service and evaluation.
Why is there a halo around my red dot?
Decrease the intensity of the illumination to a more appropriate level for your ambient light. If you are indoors or in relatively low light, having the dot on maximum brightness will almost surely cause this halo effect. If this still does not correct the issue, feel free to send it in for warranty service and evaluation.
Why won’t my red dot illuminate?
Check to ensure you are not in NV (Night vision) mode first. If the dot still won’t illuminate, try a new battery and ensure the battery cap is completely seated for a proper battery connection. If the dot is still not illuminating, it may be defective and should be sent in for warranty service.
Why is there no green dot on my Strikefire II?
Even though you ordered the Red/Green model, it’s possible you were sent a red only. Open the objective flip cap and look at the objective lens (the lens that would be farthest from your eye on the gun). Do you see a very slight green tint to the objective lens or is it definitely red? If the lens is definitely red, you have a red only version of the StrikeFire II. The dealer you purchased the StrikeFire II from should be able to exchange the unit for you if you would still prefer the Red/Green version. If returning the unit to your dealer is problematic, please feel free to call Vortex Optics at 1-800-486-7839.
Why won’t my red dot hold zero?
SPARC and SPARC II – Check to ensure that the screws attaching the mount to the red dot unit itself are the correct length. There is a long set of screws for use with the lower 1/3 co-witness shim and a short set of screws for use without the shim. Ensure you are usinOther red dots – Check to ensure the screws attaching the mount to the optic itself are tight. Also check to ensure the cross bolt attaching the mount to the receiver of your rifle is secure. If the cross bolt attaching the mount to the receiver of your rifle was not indexed forward toward the end of the barrel against the rail lug when tightening, it could also be possible that it is slipping slightly under recoil.
Other red dots – Check to ensure the screws attaching the mount to the optic itself are tight. Also check to ensure the cross bolt attaching the mount to the receiver of your rifle is secure. If the cross bolt attaching the mount to the receiver of your rifle was not indexed forward toward the end of the barrel against the rail lug when tightening, it could also be possible that it is slipping slightly under recoil.
If these do not solve the issue, feel free to send it in for warranty service and evaluation.
My red dot is flickering.
This is normally caused by a poor battery connection and can be fixed simply by
tightening the battery cap until is fully and completely seated. You will encounter
resistance before the cap is fully seated as the rubber O-ring begins to compress.
This is OK and is actually part of the water-proofing of your
red dot.
Viper red dot – The Viper red dot has a bottom load battery and thus does not have a battery cap to tighten down further for a better connection. If you are mounting the Viper to a pistol with a cut out slide, it’s possible the recoil lugs at the corners are too tall and pushing the Viper red dot up slightly, even when the screws are tightening it securely to the pistol. This will cause the battery to rattle as it is not fully seated against the pistol slide and will cause the dot to flicker. Taking a small sanding file to those recoil lugs can solve this problem or “shimming” underneath the battery with some electrical tape.
If these do not solve the problem, feel free to send it in for warranty evaluation and service.
My UH-1’s reticle looks pixelated.
By nature of holographic sight technology and the method of which the hologram is created, all holographic sights’ reticles will appear slightly pixelated. As is the case with red dots, prism scopes and other illuminated optics, if your illumination intensity is too high for the ambient lighting conditions, it will make the reticle appear worse. If you’ve turned your illumination intensity to a more appropriate level for the ambient lighting conditions and still feel it is excessively pixelated or blurry, please feel free to send it in for warranty service and evaluation.
Riflescopes
Why can't I zero my riflescope?
Note: Adjusting the riflescope to zero should not be attempted until a satisfactory 3-shot group has been achieved.
The most common issues with zeroing include:
- - I’m running out of adjustment when zeroing.
- - I dial my turrets, but nothing changes.
- - I dial a lot and nothing happens, but then after one shot it suddenly jumps to another location (wandering zero).
These are caused by one of the following:
- Over-tightened rings. We recommend 15-18in. pounds on most ring sets, but please feel free to call and ask if you have questions about your specific rings.
- Adjustable rings and bases being used are not adjusted properly. If you have adjustable rings and have questions about installing them, feel free to call us. We are happy to walk you through the process.
- A misalignment in the rifle’s barrel and action or receiver. If you do not have adjustable rings or bases and have to use up a lot of windage/elevation adjustment (or run out completely), you may have a rifle with a barrel/action or receiver that is out of alignment. This can sometimes be corrected with an adjustable ring or base set or a canted base. Please give us a call if you have questions on the process!
- A misalignment of bases. This can cause the rings to tighten unevenly around the scope tube and cause impingement of the tube or slipping of the riflescope in the rings. When using 2-piece bases, we recommend checking alignment with alignment bars and lapping the rings into proper alignment if necessary.
- The scope is sliding in the rings. Check to make sure it is secure.
- The riflescope’s main tube is bent. This can happen with hard impact or other uneven force applied to the scope tube. Roll the scope in the bottom ring halves to see if it is bent. If bent, the scope will appear to lift out of the rings rather than staying flat and rotating in place. Please give us a call if this has happened.
Why does my reticle appear canted?
- Your leveling tools used to mount the scope, and the reticle inside your scope are properly aligned, but the way you are holding the rifle causes your eye to perceive the reticle as canted. For example, right-handed shooters shouldering a rifle commonly report a reticle appearing to be canted to the left, or counter-clockwise. Left-handed shooters will generally report seeing the reticle canted to the right or clockwise. To fix this, try positioning yourself completely behind the rifle (chin aligned with the buttstock) looking through the riflescope at the reticle straight-on. This tends to eliminate that illusion created by having your head turned slightly while shouldering the rifle.
- Aiming at a target or background that is uneven, or shooting from uneven ground may cause a reticle to appear canted. Moving to more level ground may eliminate this canted appearance. A shooter not accustomed to shooting with a bubble level tool installed on their rifle may make the mistake of believing the reticle is canted because of the way the rifle needs to be held in order for the reticle to be level. You can verify this again by getting completely behind the rifle to confirm proper alignment.
- Your bubble level is sitting on top of the turret cap. This can skew your results by making the riflescope turret appear to be sitting level in relation to the rifle when it is not actually sitting level. Sometimes, the turret cap (or the fiber optic indicator on the turret cap) will sit crooked and cause the bubble level to be canted slightly. Rather than using the top of the turret cap, try putting the level on the inner turret post top (or using feeler gauges on the bottom of the scope) to level the scope.
- Your bubble level is not accurate. To test, place it on a table and note the location of the bubble. Spin the level 180 degrees and note the location of the bubble. If it is not in the same spot, your level is not level.
- The reticle is actually canted. Although very rare, this is a possibility. You can check reticle cant by lining the reticle up with any straight line and dialing the turret up and down. If it follows the line, you are good to go. If you are still in doubt after reading and investigating some of the potential causes and would like to speak with a specialist, the Technical Support team would be happy to help
Why won’t my riflescope properly focus?
- Shooting at a target too close. Verify your particular riflescope’s parallax focusing capability. For example, a riflescope with fixed 100-yard parallax or 50 to infinity parallax may have some distortion when shooting at 10 or 25 yards, because the target is too close for the rifle’s focusing capability.
- Mirage is a heatwave-like distortion that may cause significant distortion on targets at a long distance. It can occur in a variety of different temperature patterns but will be most noticed when shooting at extended distances with a high-magnification riflescope. Sometimes backing off the magnification can help alleviate this issue.
- Barrel or Suppressor Mirage. This effect is similar to mirage observed downrange but originates from the barrel or suppressor getting hot after several rounds have been fired. The shooter can alleviate this by letting the rifle cool or installing an anti-mirage suppressor shield/ barrel mirage band.
How do I properly focus my riflescope?
Adjust the reticle focus.
Note: If the scope is a fixed power unit, skip steps 1 and 2.
- Turn the magnification ring to the highest power.
- Turn the parallax focus to ‘Infinity’. Note: Side focus parallax adjustment knobs mar or many not have distances marked.
- Turn the ocular bell/eyepiece all the way in.
- Aim the scope at a blank white wall or up at the sky with no cloud coverage.
- Look at something nearby, then look at the reticle through the scope. If the reticle is out-of-focus, turn it slightly to begin focusing the reticle but look away from the scope. Make sure to look away from the reticle after a few seconds to ensure your eye doesn’t naturally try to bring the reticle into focus. You want to look through the scope and see a sharply focused reticle immediately with your eye relaxed.
- Once this adjustment is complete, it won’t be necessary to re-focus every time you use the riflescope. However, as eyesight may change over time, we recommend re-checking this adjustment periodically
- Only complete this step if your riflescope has a side focus parallax adjustment or adjustable objective (AO) feature. These riflescopes feature a separate focus which should be used to fine-tune the image focus. When the image is sharply focused, parallax error will also be eliminated.
- Be sure the reticle is correctly focused.
- Turn the side focus knob or AO until the target image is as sharp as possible. The yardage numbers referenced should somewhat match the actual yardage to the target, but keep in mind these are not exact and are more of a guideline than a concrete reference point.
- Check for parallax error by moving your head back and forth while looking through the scope. The focus is correct if there is no apparent shift of the reticle on the target. If you notice any shift, adjust the focus knob slightly until all shift is eliminated.
Warning: Looking directly at the sun through a riflescope, or any optical instrument can cause severe and permanent damage to your eyesight.
Over-tightened rings can restrict movement of the parallax cell and cause the parallax knob to turn hard or not even change the focus of the image at all. We recommend 15-18 inch pounds on most ring sets, but please feel free to call and ask if you have questions about your specific rings.
Why are my riflescope’s turrets ‘backwards’?
Check to ensure you are thinking in terms of moving the bullet’s point of impact rather than your actual point of aim when you dial your turrets. For example, when you are shooting low and dial your elevation turret ‘up’, your reticle should actually physically move downward, but it does this so that you need to point the barrel ‘up’ in order to get back on target again. When you move your barrel up, it brings your point of impact up and on target where you want to hit. This can be confusing when initially bore sighting the riflescope as this is the only time where you want to think about actually moving the reticle, but once you start shooting and thinking of moving the bullet holes down range rather than moving the reticle, it will be much easier.
Why don’t I have as much adjustment in my scope as the specifications indicate?
The specifications chart for any riflescope will list the scope’s total range of adjustment for both elevation and windage. It’s important to consider that this is the total range of adjustment available from the absolute bottom to absolute top, or most left to most right of the scope. When you receive your scope new from the factory, it will be optically centered in the middle. Though unlikely, assuming your zero is at that optical center, this would mean you have exactly half the total range of adjustment in all directions. If you’re shooting long range and dialing ‘up’ as you extend your range, you will have half the total range of adjustment to account for bullet drop.
To put this into perspective, The Diamondback Tactical SFP 4-12x40 has 70 MOA of total elevation adjustment. Again, assuming we’re zeroed at the optical center, we’ll have 35 MOA of available adjustment to account for bullet drop at longer distances. If you need more available room for adjustment than your riflescope provides, consider getting a canted mount or base. 20 MOA canted mounts and bases are quite common and ‘cheat’ in some extra adjustment to your scope by canting it down slightly, causing you to zero higher in the scope’s range of adjustment, leaving more room for adjustment below to dial out to greater distance.
Spotting Scopes
Why am I not getting the full sight picture when looking through my spotting scope?
This will come down to eye relief. As you go up in magnification, the eye relief shortens, and you have to get closer to the spotting scope to achieve the full sight picture. All of our spotting scopes have an adjustable eye cup. On the higher magnifications, you may find that you have to turn the eye cup in (clockwise) to achieve the full sight picture.
Why is my spotting scope not as bright on the highest power?
With any variable powered optic, as you go up in magnification, you decrease the amount of light reaching your eye. The less light reaching your eye, the ‘dimmer’ the image will appear. The higher quality the optic, the better it will perform at the higher magnifications.
Can I Digiscope with my spotting scope?
Yes, please call us at 1-800-486-7839 ext. 6 for more information.